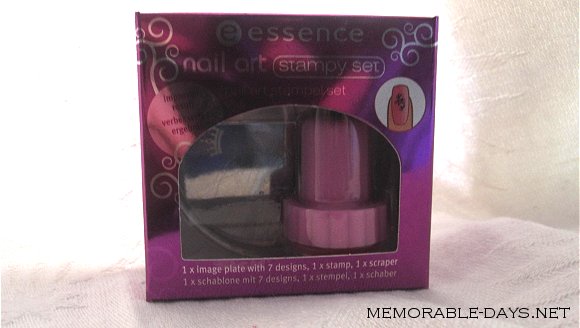
In this blogpost I'm going to use the Essence nail art stampy set. This stampy set comes with 1 stamping plate with 7 designs, 1 stamp and 1 scraper. The price for this set is
€3.-. You can also buy a kit at the
Born Pretty Store which comes with a plate as well for less than $3.88 and free shipping.
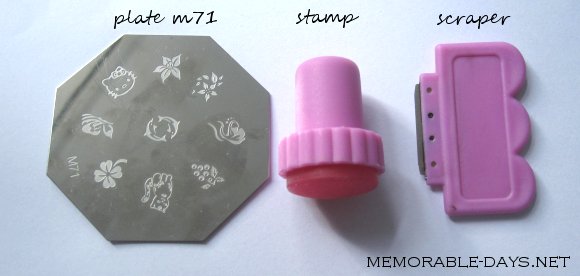
However I'm not going to use the stamping plate which is in the Essence stampy set today. I'm going to use the Hello Kitty stamping plate which I got for free at
Born Pretty Store. Have you girls receive it yet?
What else do you need before you start? cotton pads, nail polish remover, large piece of paper and nail polishes. You have to put a piece of paper or a large sheet under your stamping plate cause it's going to get ( ゚Д゚) dirty! Btw. I recommend a thick nail polish with a good coverage, cause you won't see much with a sheer nail polish =/. Make sure that you removed the plastic cover on the stamping plate. Ok ready?!
Step 1: Choose a design, I chose the Hello kitty design of the stamping plate m71.
Step 2: Put some nail polish on the Hello Kitty design, cover it completely. I used the Dear'Lee black nail polish.
Step 3: Use your scraper and scrape off the excess polish, leaving only the nail polish what's in the indentation of the design. Remember: you have to scrape it fast and you can only scrape it once. Don't scrape it again if it didn't work in the first place cause your scraper is dirty - just clean it with nail polish remover and start over again.
Step 4: Use your stamp and press it on the design. You can stamp it straight down onto the design or you can use a rocking motion, pressing the stamp down starting from the right then rocking it to the left. Remember: the time between the scraping and the stamping should be very short, cause the nail polish will dry very quick.
Step 5: Quick check if the whole design is on your stamp.
Step 6: Quickly press the stamp on your nail following the curve of your nail. This has to be fast as well since the nail polish can dry on your stamp.
Step 7: And you're done ^^. Woops, the placement isn't really correct but I'm still a newbie heheh....
I cleaned the plate, stamp and scraper after every use with some nail polish remover and cotton pads. It takes some practice to get the correct timing and placement on your nail. Besides, you have to work very quick on every step cause the nail polish will dry fast.
You can also put two nail polishes on the design, see pictures below. This design is from the same stamping plate (M71) It doesn't look perfect yet xD I need to practice more lar..
Hope this tutorial helped, if you have any questions feel free to drop a comment ^_^~


That is so cute! :) x
ReplyDeleteHandig! Met twee kleurtjes is erg leuk inderdaad :)
ReplyDeleteOeh leuk zeg!
ReplyDeleteIk heb er zelf ook 1. Helaas krijg ik door dat essence scraper ding allemaal krassen. Op internet wordt aangeraden om het met een oud bankpasje te doen :)
@Sam, Ja, helaas zag ik ook al krasjes na een paar keer krassen =(. Maar door het zachtjes te doen en zodra je weet hoe je het moet krassen krijg je ze niet. Maar inderdaad met een bankpasje heeft dezelfde werking eigenlijk :) is misschien wel beter xD?
ReplyDeleteHello Kitty = cute! ^.^
ReplyDeletethanks for the tutorial!!! i don't know how to use konads, lol. and this konad plate came in from the mail sometime ago but i don't have a stamper nor a scrapper =.= they don't sell these things in HK...boo!
ReplyDelete@Jennifer, i saw it on born pretty store for a cheap price, so you can buy it there ;)
ReplyDeleteCute! Thanks for this, I'm still waiting for my konad plate from Born Pretty Store and I don't have the stamping set yet so I must purchase that somewhere xD Probably on eBay, haha~
ReplyDeletethanks for the tutorial..i always see other bloggers using it but never gave a tutorial HOW to..been wanting to try this out for awhile now, just never got around to actually purchasing it <3
ReplyDeleteThis tutorial was heaps helpful ^__^" thankyou <3 and hmmm, I haven't received mine yet so I guess I'll have to wait :(
ReplyDelete@Jennifer :) you're welcome! yeah, i'm sure that they have it on ebay as well ^^
ReplyDelete@Sushi, i haven't seen many tutorials about how to put it either, so that's why decided to post about it ^^ hihi.. glad that i could help =]
ReplyDelete@Melody, yess, i'm sure that they will send it to ya since most of the people already received it ^^ hope it will arrive soon!
ReplyDeleteOooh creabea o:
ReplyDeleteIk heb echt geen geduld voor zoiets haha...
I love the Hello Kitty ^^
xx~
:O So that is how it works. This entire time I thought you just placed the plate over your nails hahahaha
ReplyDeleteThat's pretty neat! :D
ReplyDelete@Michelle, ahhahaha are you serious? lol xD!!
ReplyDeleteVery useful! Thanks a lot! *bloglovin like*
ReplyDelete@Charlotte, thank youuu =D!!
ReplyDeletecute :) thanks, now if i get one i will know how to use it! :) and thanks for posting about the free stuff, thanks to you i ordered the rhinestones :)
ReplyDeletewell i saw the nail stamping stuff earlier and found another way to do it :)it only requires your printer!
http://xoxchocobunny.blogspot.com/2011/02/catch-up-and-nail-art-tutorial.html
Haha thanks for the tutorial! I think I'm too slow in my stamping, because the polish never makes its way fully onto my nails. And I agree that more practice definitely helps :D
ReplyDeleteoooo i have one of these ! :D
ReplyDeleteBut i haven't used it in a while :/ Need to get some more different plates D:
so adorable!! you also did so perfect
ReplyDelete@hihihi! great job ^^ it worked quite well on your nails ;). But I know that heaps of people are clumsy and can't put the nail polish neat on the printed picture ;).
ReplyDelete@Rinny, jup, practice really helps =D
@Fruity lashes, thank you =D
ReplyDeleteSuper leuk, thnx!
ReplyDeletex
Awe cute i love hello kitty! stamping art rocks!Its so easy to use to so professional!
ReplyDeleteeven buying those things am unable to use it...
ReplyDeletehanshu
it's hard.. but practice and you will get the hang of it ;)
ReplyDeleteit does not work....the design does not come at all on the stamping tool....how do i do it???
ReplyDeletehave you removed the plastic which is on the stamping plate? see picture here:
ReplyDeletehttp://www.memorable-days.net/2011/02/hello-kitty-stamping-plate-from.html